
We would like to thank Jeremy Somerville for the opportunity to share with you his incredibly useful article 
https://www.facebook.com/jeremysomphoto/
https://www.instagram.com/jeremysomphoto/?hl=en
Understanding Flat Port and Dome Port Theory
One of the key features of underwater photography is the dome port. Despite it's ubiquity, it's effects are largely misunderstood or at the very least, poorly explained. In this post I'm going to talk about why we use dome ports, how they work and what's the best way to use them. Most importantly of all, I'm going to try and explain all of this in a way that makes it simple to understand. There is a bit of physics involved but I've tried very hard to make it as easy to understand as possible.
Currently if you search the interwebs for dome port theory, you may be extremely discouraged to learn that the information that is out there is not only confusing but in some cases downright contradictory. The most accurate explanations of how dome ports work are highly technical, but still leave out important concepts of dome port theory. The right information is out there, but it's buried under a lot of noise that doesn't make a whole lot of sense. My main motivation in writing this post is to try to clear it up.
A bit of light reading
A lot of what I'm talking about in this post is to do with the physics of light and refraction so a quick refresher might come in handy. Physics may or may not be your strong suit, but it's worthwhile trying to understand. I will constantly make references to these concepts throughout this post.
Refraction
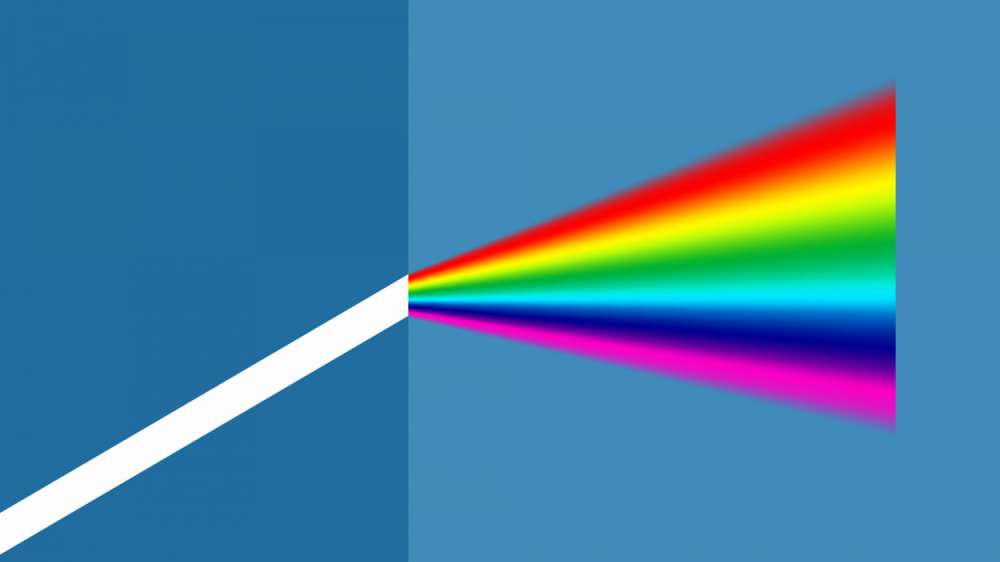
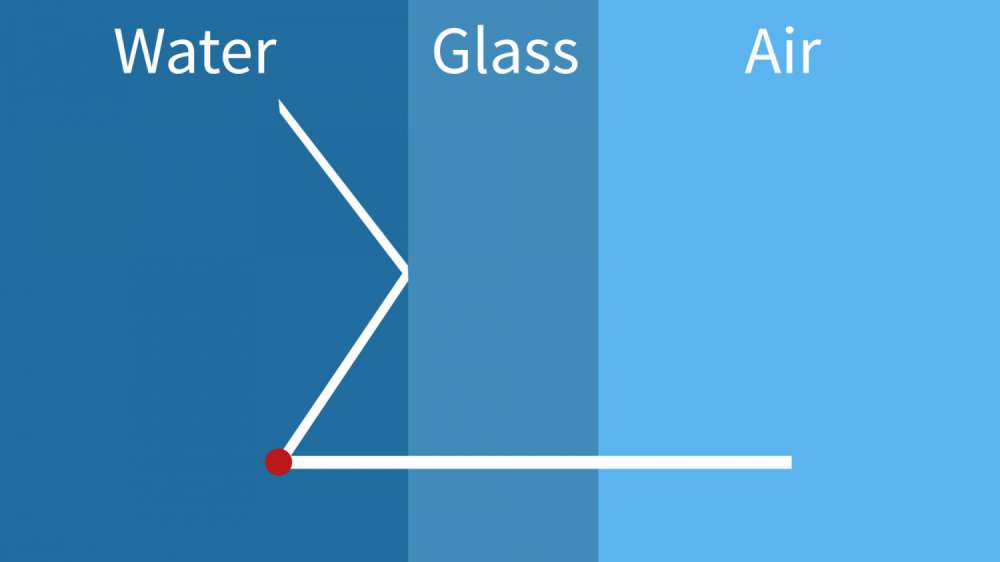
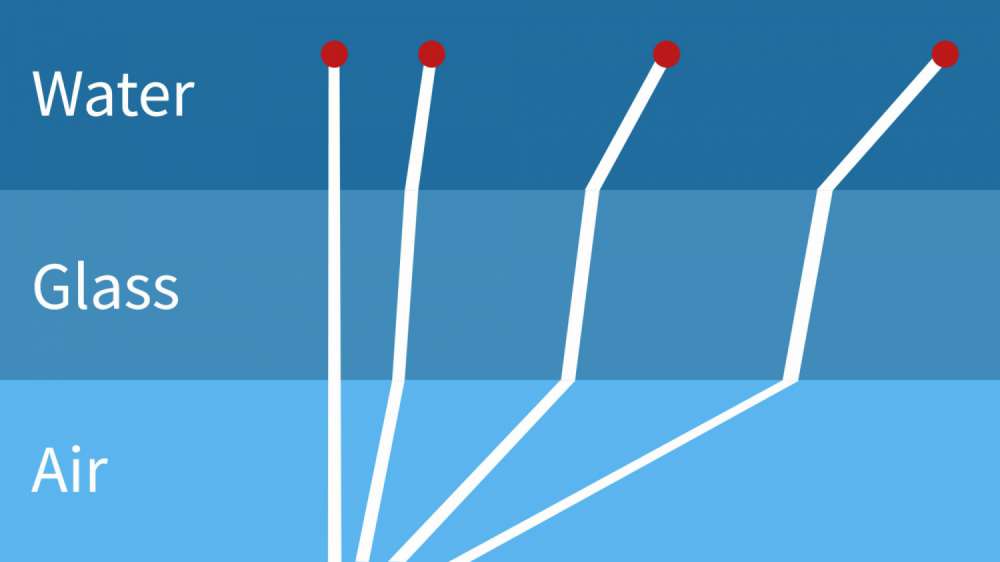
The rules of refraction (Snell's law) means that light changing medium (e.g. from air to glass) causes the light to bend and thus changes direction. In fact this is basis of all photographic lenses. Without refraction, photography would be very difficult indeed. Refraction happens in different amounts for different colours. So red light will bend less than blue light and cause the colours of the light to split up. This is called chromatic aberration. The more refraction, the more chromatic aberration. You don't need to understand why light bends when it changes medium. You just need to know that it does.
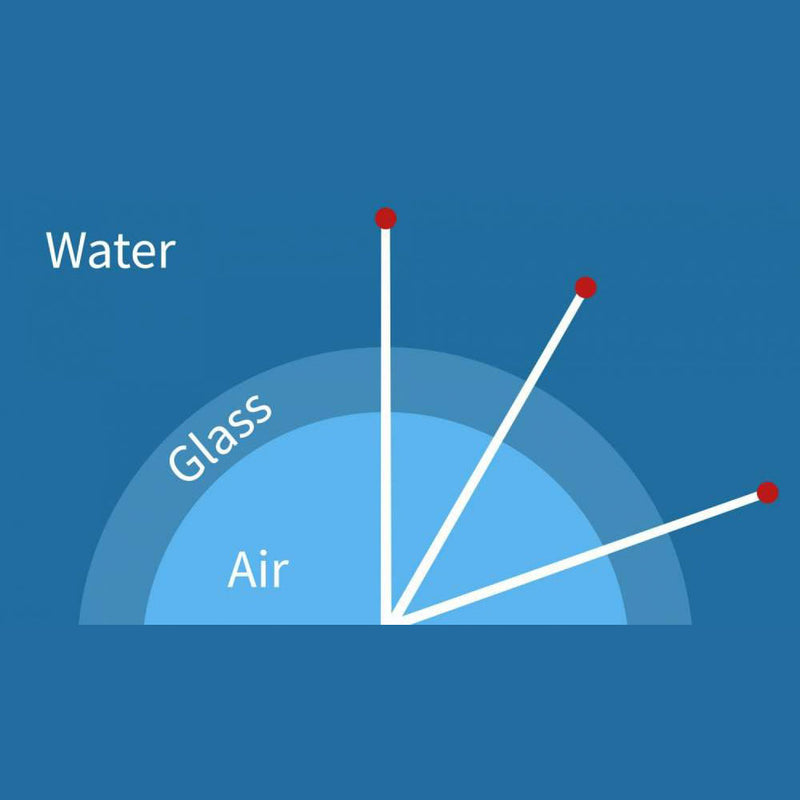
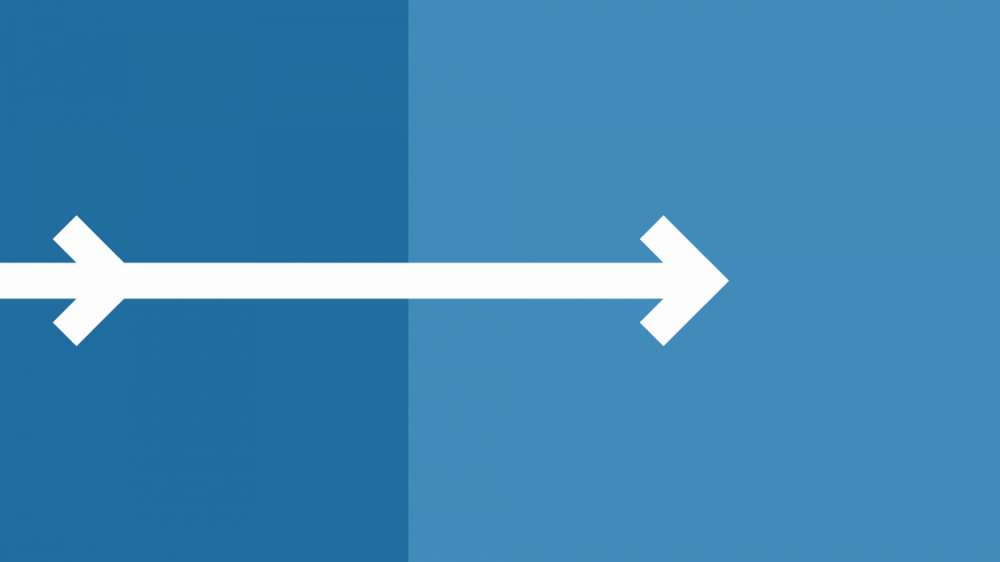
As you probably already know, the angle that light hits the new medium affects how much refraction there is. Light that hits the medium dead-on (at a right angle) will travel straight through. The shallower the angle, the more refraction there is.
Photons
Here is another important concept. Light travels in packets that we call photons. Think of them like water drops in a stream of water. When a photon of light hits an atom in the real world, that atom absorbs the light, and then re-emits it in a random direction. Because there is so many photons hitting it, it means that the atom can be 'seen' from every possible angle.
This all sounds very complex but it basically just means that you can see an object no matter where you're standing. More scientifically, it means that a point source of light (an atom) emits light in all directions.
Two ways of thinking about light
In this little section I want to talk about the two main ways of thinking about the path of light. As mentioned above, an atom will emit light in every possible direction. That's great but we also need to consider that real-world objects are made up of billions of atoms, each of which do the same.
What this means for us in the context of this subject is that there are two ways to show the path of light. These are both shown in the diagram below.
The two sides to the image above almost look like opposites, but they are not. In fact they are just showing different parts of the same thing. The image on the left shows the light that is being emitted from a single point (i.e. in all directions). The image on the right only shows a single ray from each point.
The reason this is done is so that the image doesn't get too cluttered. Imagine drawing the image on the right, but with 3 rays coming from each point. It would get busy very fast and very confusing.
In most articles on the subject of underwater photography you will only see diagrams similar to the one on the right (Type B). I believe this makes dome port theory harder to understand. In fact, I actually think that diagrams like the one on the left (Type A) are crucial to proper understanding.
What is a dome port?
All underwater camera housings use some kind of port. In this context, a port is not a place for a ship to dock. In fact, it's analogous to a porthole on a ship. It's a small see-through window which you can look through.
On a camera housing, ports are often modular which means they can be switched out for ones that are different sizes or shapes. There are two main types of ports, flat ports and dome ports. The differences are obvious when viewed side-by-side. One is a flat window, and the other is shaped like a dome.

Why use a dome?
Flat ports are cheaper, simpler and more durable than dome ports but they are limited. In order to understand why we need dome ports, we must first understand how flat ports work, and where they fall down.
First, The Flat Port
A flat port is simple. It is a port with a flat piece of acrylic or glass placed in front of the camera lens. Above water, the effect of this port is unnoticeable (to most people), but if you take this port below water, well that's when things start to get interesting.
If you stick a flat port underwater, it has the curious effect of enlarging everything. At least, that's what everyone says it does.
It sure looks like it, although it's really not a very good description of what's going on. For instance, many people equate it to having your lens increase in focal length (by say 25%). That's really not what's happening at all and in fact that kind of thinking can actually get you in trouble when you start thinking about domes.
Contrary to popular belief, a flat port does actually create a virtual image. It's just nobody talks about it. As far as I can tell not many people know that's the case. In my searching I couldn't find a single article that discusses the virtual image created by a flat port. Many articles actually incorrectly state that flat ports don't produce a virtual image.
As you can see in the diagram below, when light travels through water and is refracted by a flat port it's angle is changed thus creating a virtual image. In this case the virtual image appears closer to the lens then where the actual object is. Put simply, it makes objects look like they are closer to the lens than what they actually are.

Objects appear to be closer, therefore they appear to be bigger as well. That's just common sense.
You might ask what the difference is between this and simply zooming in with a lens. The answer is focus. When you zoom in with a lens, objects are magnified but they do NOT appear closer. Focus still occurs at the correct distance.
In this case the virtual image of objects are actually appearing closer which makes them look bigger. This means in order to focus on them, you must focus closer than the actual distance to the object. In the diagram above, this means focussing on the blue dot, not the red.
Check out the interactive Flat Port Virtual Image Calculator to see how this virtual image works.
The problem with flat ports
A large number of underwater photographers are aware that a flat port will 'magnify' objects (even if they are unaware that it's caused by a virtual image). This 'magnification' means that wide angle lenses (every lens actually) won't be as wide underwater. This is alright for macro photography but not so great for taking wide-angle shots underwater. This is the first problem with flat ports but it's not the most concerning.
Maximum field of view
Have you ever stuck your face right up to the glass of an aquarium? You can see fine when you look straight ahead, but not so great when you try to look through it at an angle. There's too much reflection and distortion to see clearly. Well it's actually exactly the same thing with a flat port.
Due to the limitations of Snell's law, light won't enter a medium if it hits it at too shallow an angle. Instead it bounces straight off. It is reflected. This is known as total internal reflection and it's how fibre optic cable is able to transmit light around tight curves over extremely large distances.
What does this mean for photography? Any lens with a field of view greater than about 90° will suffer from extreme vignetting. That's another problem but it's still not the whole story.
Flat port distortion
Remember when I talked about how more refraction means more distortion and more chromatic aberration? Well yeah. This is the flat port's biggest problem. Light from objects towards the edge of frame will hit the port at a much shallower angle than those in the center. As a result, objects suffer from more and more distortion as they move towards the edge of frame. This effect is worsened by both wider lenses, and wider apertures.
This creates another limiting effect on field-of-view. Most underwater photographer's won't put a lens in a flat port that has a field-of-view greater than 60°. For most people the distortion and loss of quality becomes too great after that point.
To fix this, we need a way for the light to travel through the port with as little refraction as possible. The solution to this problem is the dome port.
The solution to the flat port
With a dome port, it doesn't matter what angle the light is coming from, the curvature of the dome means that it can still hit the port at a right angle. In other words, it can hit it dead on.
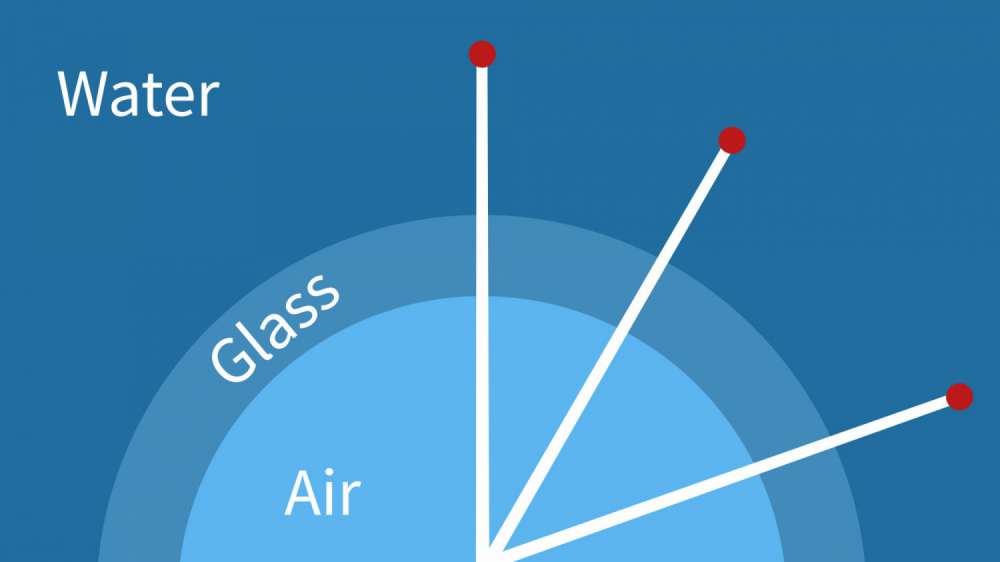
Because the light can hit the port at a right angle, it also means that that ray of light travels through the port unaffected by refraction. That's awesome!
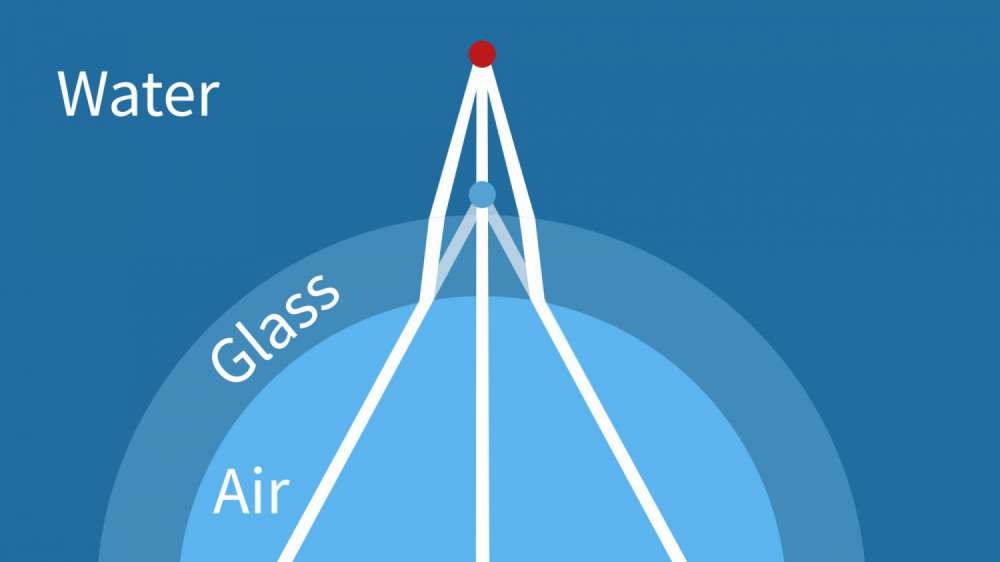
It's important to remember though that the diagram above is only half the story. While it's true that the light hit the port at a right angle, that doesn't mean that it always does. Objects emit light in every direction. Only one of them can go straight through. Check out the diagram below.
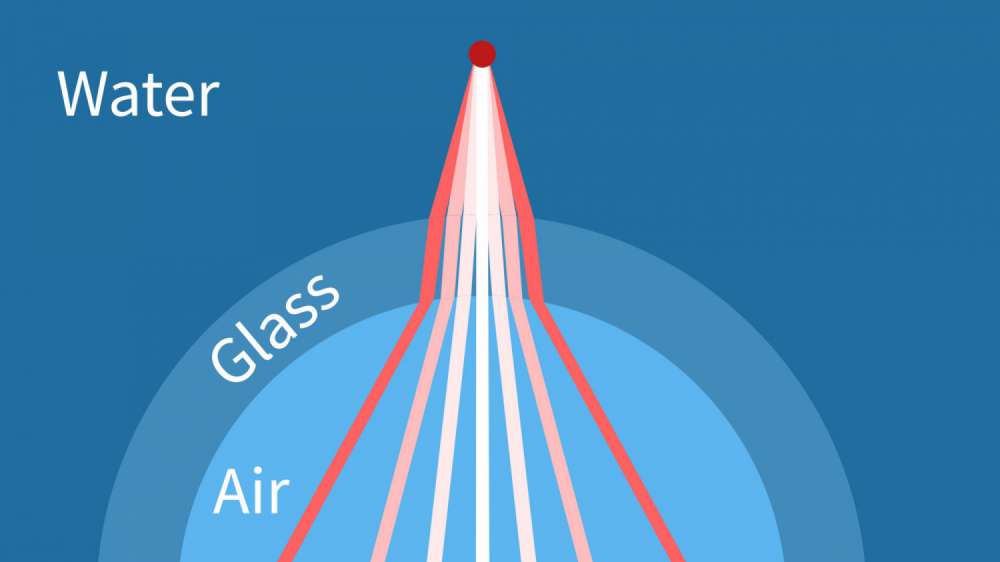
In the above diagram, there is only one ray of light that goes through unaffected by refraction. The rest are affected to various degrees. The further away the light is from the unaffected ('perfect') ray, the more refracted it is.
Looking at this you might wonder how the dome port is any good at all. It's not like you can separate out the perfect ray from all the others. Or can you?
Well kinda, but we don't really have to anyway. This is where the aperture in the lens comes into play. Imagine if we place a small aperture (aka. stop) in the center of this diagram.
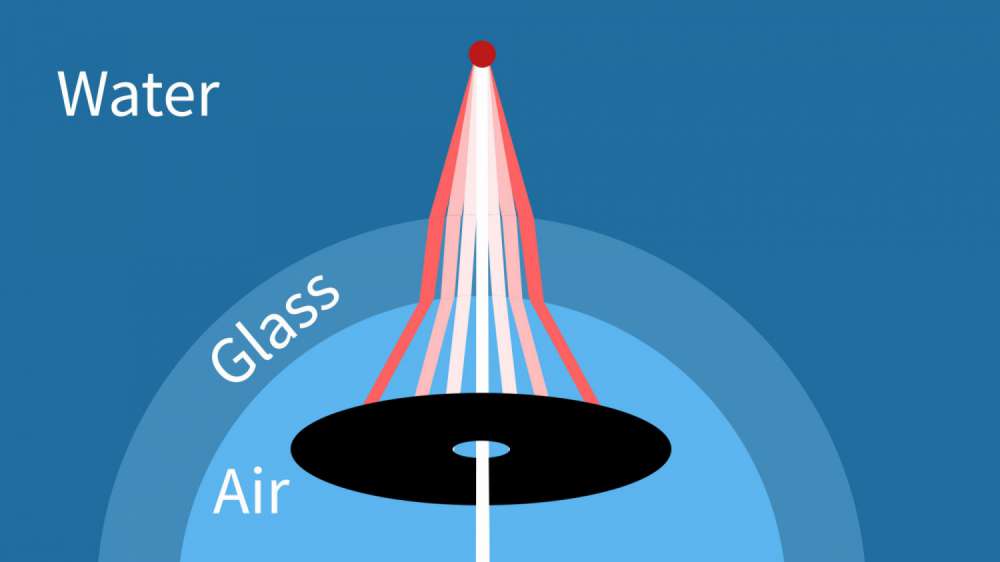
Awesome! There is however one caveat. The lens has to be positioned in exactly the right spot within the dome in order to capture the best light from every angle. This is the why dome port positioning is so important.
Correct dome port positioning
There is only one correct place to put a lens inside a dome port. It's actually really simple and it's demonstrated in the diagram below.
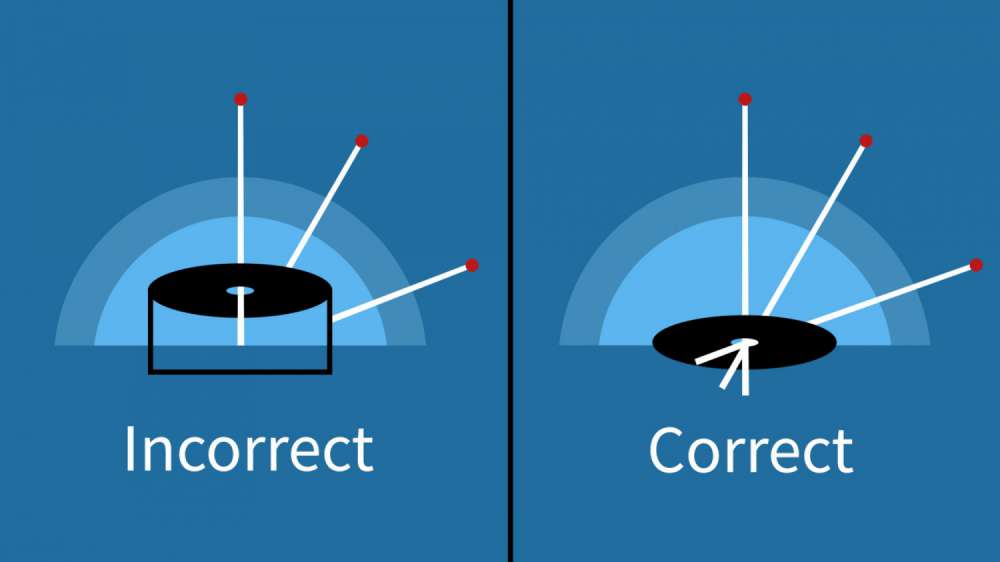
The only way for light to get into a lens is if it goes through the entrance pupil. That is the only thing that matters. If it doesn't get through there, it cannot be captured by the camera.
If you think of a dome port as half of a sphere then it's clear that all those 'perfect rays' have to go through the center of curvature. They are all radii of the dome.
There is a problem though (yes another one). Most dome ports in the real world aren't perfect hemispheres. They are only part of a hemisphere. See the diagram below.

The common dome port is missing a part. This makes the port seem flatter (read: more compact), makes it contain less air and also makes it cheaper to produce. It's worth noting that many dome port sizes are available and generally the size they sell it as, isn't the diameter of the dome's sphere. It's actually the length of the widest part of the dome. This means that an 8 inch dome port isn't actually part of an 8 inch diameter sphere. It's 8 inches across but it's actually part of a much larger sphere. This can make it harder to correctly place a lens.
The entrance pupil
So we know that the light has to go through the entrance pupil but what exactly is that? The entrance pupil is just the apparent position of the aperture when looking through the front of the lens. It is the virtual image of the aperture caused by the glass in front of the aperture.
So how do you find the position of the entrance pupil? Easy just look at the lens and measure how far back the aperture appears to be. Remember the entrance pupil is where the aperture to be, NOT where it would actually be if you cut open the lens to find it.
The entrance pupil is equivalent to the parallax point and the center of perspective. The entrance pupil is NOT a nodal point. This is a common misconception.
So what do you have to do?
The secret to dome port positioning is simple. Align the entrance pupil with the center of curvature of the dome port. That way all that good light is pointed directly at the entrance pupil, which will therefore travel through the aperture and thus be captured by the camera.
The dome's virtual image
As with the flat port, the dome port also produces a virtual image. Again, as with the flat port, in order to achieve focus, a camera must focus on the virtual image and not on the actual object.
Have a look at the Dome Port Virtual Image Calculator for a better understanding of how dome port attributes affect the position of the virtual image. Even better compare them to the Flat Port Virtual Image Calculator for a comparison of the difference between a flat port virtual image and that of a dome port. If you do that then you'll see that a dome port's virtual image has a stronger effect. This means that you need a lens that can focus a lot closer to the lens.
What's not immediately obvious about the dome port's virtual image from this diagram is that no magnification occurs. The dome port makes things look closer but it also shrinks them. This exactly cancels out the 'magnification' effect so everything appears the correct size. Cool huh?
The problem with dome ports
Dome ports solve a lot of the problems that flat ports have but they also introduce some pretty quirky behaviour.
Dome ports have severe field curvature. Basically this means that flat things appear curved (like the shape of the dome). This isn't a huge problem because there aren't many perfectly straight, flat things underwater.
Dome ports are also bulky, easy to scratch and are full of air (which can be a problem underwater).
In conclusion
Yes that's pretty much all the important dome port theory you need to know. Hopefully I've helped to dispel a few myths about flat ports and dome ports and I hope you've found this to be an interesting and new way of looking at dome ports and dome port theory. I've tried to write this so that is easy to understand with as few logical jumps as possible. If you're confused by something, or otherwise feel I didn't explain something properly, please feel free to leave a comment below. I'll try my very best to fix anything like that.
Happy underwater shooting!
You can visit the website with the original article here (https://oceanity.com.au/articles/view/understanding-flat-port-and-dome-port-theory)